Thursday, April 24, 2014

Final Travel Photos


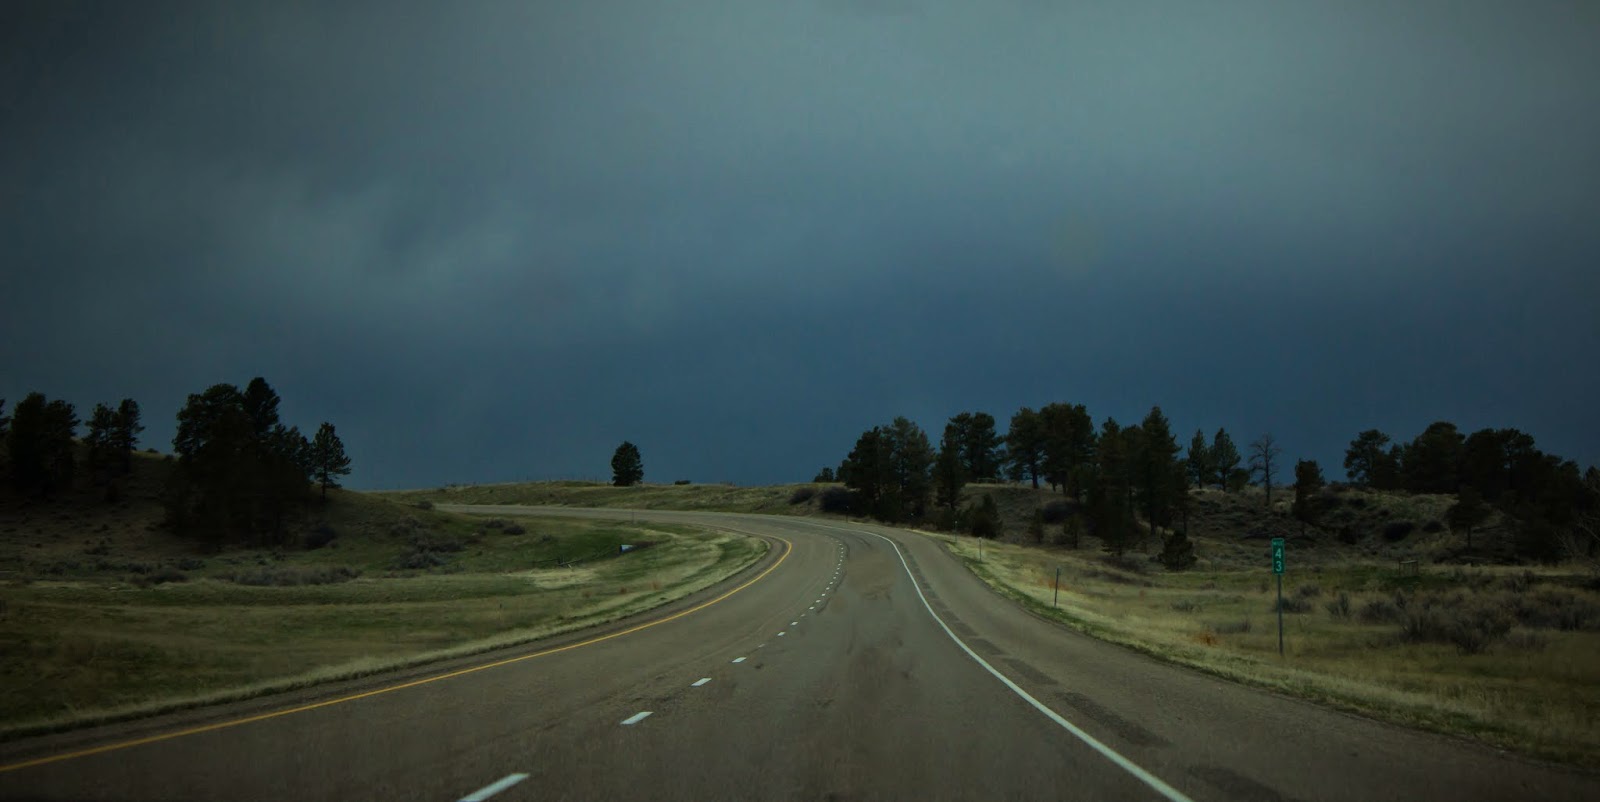
This photo was taken on I-94 east of Billings, Montana. Canon Rebel T3i, 55 mm lens, ISO 200, f/5.6, 1/500 second. In Lightroom, I added a vignetting effect, adjusted the white balance, cropped the photo, boosted the blue, vibrance, and saturation, and exaggerated the highlights and shadows, all to give a more dramatic and vintage look.


This photo was taken at the train station in Glendive, Montana. Canon Rebel T3i, 55 mm lens, ISO 800, f/9.0, 1/2000 second. In Lightroom, I adjusted the white balance, again to give the photo a more rustic look. I also exaggerated the highlights and shadows, boosted the vibrancy and saturation, boosted the red and lowered the orange hues, and added a slight vignetting effect.

Final Commercial Photos


Taken at Rocky Mountain College with model Laura to advertise the Canon Camera. Canon Rebel T3i, 250 mm lens, ISO 400, f/5.6, 1/1250 second. In Lightroom, I sharpened the camera and logo, boosted clarity, vibrance, and saturation, and decreased contrast, highlights, and shadows.


Taken in downtown Billings, Montana to advertise the red Western-style purse. Canon Rebel T3i, 100 mm lens, f/5.0, 1/500 second. In Lightroom, I added a vignetting effect, adjusted the white balance, decreased highlights and shadows, and boosted clarity, vibrance, and saturation.


This photo was taken by Courtney Buckman to advertise the pearl necklace and earrings. Canon Rebel T3i, 90 mm lens, ISO 200, f/4.5, 1/400 second.

A Sample of Final Photos

Taken outside of Molt, MT. Canon Rebel T3i, 18 mm lens, ISO 400, f/14, 1/20 second

Taken on road outside of Red Lodge, MT. Canon Rebel T3i, 18-55 mm lens at 37 mm, ISO 400, f/14, 1/80 second. Vintage look created in Lightroom.

Taken outside of Red Lodge, MT. Canon Rebel T3i, 18 mm lens, ISO 400, f/14, 1/100 second. Converted to black and white in Lightroom.

Taken near Big Lake outside of Molt, MT. Canon Rebel T3i, 18-55 mm lens at 23 mm, ISO 400, f/14, 1/30 second

Taken of Yellowstone River in Billings, MT. Canon Power Shot SX110, 6 mm lens, ISO 80, f/4.5, 1/640 second

Taken outside of Molt, MT. Canon Rebel T3i, 18 mm lens, ISO 400, f/14, 1/6 second

Final Night Photos


This long exposure photo was taken outside of Molt, Montana with my Canon Rebel T3i and my 18 mm lens. ISO 100, f/3.5, 30.0 second exposure. In Lightroom, I boosted the blues, vibrance, and saturation, sharpened the barn, and decreased highlights and shadows.


This star trails picture was taken outside of Billings, Montana with my Canon Rebel T3i and my 18 mm lens. ISO 800, f/3.5, 1509.0 seconds (25.15 minutes). In Lightroom, I cropped the photo, darkened the shadows, highlights, whites, and blacks, used a gradient filter to adjust the foreground exposure, and boosted the overall contrast.


This light painting picture was taken outside of Molt, Montana with my Canon Rebel T3i and my 18 mm lens. ISO 100, f/3.5, 30.0 seconds. In Lightroom, I boosted the red to bring out the light painting, sharpened the barn, boosted exposure and contrast slightly, and added a minimal vignetting effect.

Final Landscape Photos


This picture was taken of the Perrine Bridge from Centennial Park in Twin Falls, Idaho. I used my Canon Rebel T3i and my 18mm lens. ISO 400, f/16, 1/50 second. In Lightroom, I boosted the vibrance and saturation as well as lowered the highlights, shadows, and blacks.


This photo was taken outside of Molt, Montana with my Canon Rebel T3i, 18-55 mm lens (at 21 mm). ISO 400, f/14, 1/80 second. In Lightroom, I cropped the photo, decreased highlights, shadows, and blacks, boosted clarity, vibrance, and saturation, and reduced noise.


This photo was also taken outside of Molt, Montana with my Canon Rebel T3i and my 18-55 mm lens (at 30 mm). ISO 800, f/16, 1/3200 second. In Lightroom, I adjusted the white balance to bring out the warm tones for a more rustic look, boosted exposure and contrast, and increased vibrance.

Wednesday, April 23, 2014

Moving on ...


Shot of the Day

With this photography class coming to a close, I wanted to create a post regarding my passion: equine photography. I hope to continue working in a world of horses and cameras, so I found this article listing some tips for equine photography. When capturing these constantly moving animals, the photographer Craig Payne notes that shutter speed is the most important priority for creating good equine photos. This also means that the photographer needs to keep an eye on ISO and aperture settings if using a shutter speed priority mode. He also notes that sacrificing image quality by increasing the ISO, especially in an indoor arena, is sometimes preferred in order to catch a crisp action shot of the horse. I thought these were interesting ideas. Here is the article:

 http://www.digitalcameraworld.com/2013/04/19/professional-photographer-to-the-rescue-horse-photography-without-the-long-face/


Here is another article with some basic tips for equine photography, accompanied by some good examples of horsey photos. It also stresses the need for a fast shutter speed, and advises that the photographer watches for details such as clean, non-distracting backgrounds and how the position of the horse's ears can convey different emotions in the photograph. Check it out!

http://www.digital-photo-secrets.com/tip/3179/photographing-horses/

Photo Editing


Best photo editing tips for beginners: No. 1

As the semester draws to a close, it is time to do those final edits on our class photos. This website I found provides some basic tips for photo editing, specifically using Photoshop Elements. While this program is very basic, these tips and edits are easily found on most photo editing programs. And, I find that repetition is always helpful when it comes to learning! So check out this article for some helpful reminders when it comes to editing photos.


http://www.digitalcameraworld.com/2013/08/30/best-photo-editing-tips-for-beginners-18-quick-fixes-to-common-image-problems/

Wednesday, April 2, 2014

Tips for Commercial Photography


 Tips For Commercial Photography

With our commercial photography shoots approaching, I decided to post some tips I have found on how to improve photography for advertising. This website lists three tips to help the photographer display the product at its best. First, make sure the product is adequately lighted and not hidden in shadows. Then, make sure the product is photographed in its proper place, a place that makes sense for the product to be used (for example, don't shoot a chainsaw in the living room). Finally, don't be afraid to capture unique angles of the product--this will make a "normal" product look fresh and interesting! Check out the link here:

http://www.steves-digicams.com/knowledge-center/how-tos/becoming-a-professional-photographer/3-tips-for-improving-commercial-photography.html

Another thing to keep in mind when photographing products for advertising is, simply, the product itself! By considering what the product is used for, its key features, and what distinguishes it from competitors, you will get more ideas of what to photograph in order to show off the product and inform potential buyers about it at the same time.

http://www.openphotographicsociety.org/photography/genres/industrialcommercialadvertising/advertising/1366-ten-advertising-photography-tips


Jewelry Photography

Finally, this site consists of blog entries from Orlando Commercial Photography. These blogs have numerous tips about specific parts of commercial photography, from photographing jewelry to portraits to children. An interesting tip I found, shown in the photos here, is how effective a simple background can be to show off the product; it doesn't need to be complicated! The blog is certainly worth reading!


http://www.orlandocommercialphotographer.net/category/commercial-photography-tips


Thursday, March 27, 2014

Lifestyle and Commercial Photography


2 zoom in


I decided this week to explore the definitions and differences between lifestyle and commercial photography, since these are the next topics to be discussed in class.

Lifestyle photography captures the little details apparent in everyday life. These photos can capture special memories or simply random events in daily life. This article displays some great examples of lifestyle photography. I especially love the little details that these photos capture! It also includes tips for how to capture those moments, which is especially easy in today's world of seemingly endless storage for digital photos and the exceptional quality photos most cell phones can provide in a compact device.

http://www.abeautifulmess.com/2012/03/5-tips-for-lifestyle-photography.html


Commercial PhotographyCommercial photography focuses on displaying a product or service with the intent to sell. I found this article from fstoppers.com which asks several different professional photographers to give their definition of commercial photography. I thought it was interesting to see the similarities and differences in each person's response. I especially liked Dave Geffin's answer: "Commercial photographers are employed to create compelling visual images that speak to the target audience of that product." This definition implies that while the end goal is to sell a product, the means to that end still require an artistic approach that inspires others to act.

http://fstoppers.com/fstoppers-answers-what-is-commercial-photography


The final website I looked at went into more detail concerning the different distinctions of commercial photography, including travel, product, fashion, and advertising.

http://www.all-things-photography.com/commercial-photography.html


Thursday, March 20, 2014

A History and How-to of Time Lapse Photography


This week, I have explored the history of time lapse photography. It began with a horse racing bet in the nineteenth century. Racing aficionados argued whether or not a horse's feet all left the ground simultaneously while galloping. The motion was too fast for anyone to tell with the naked eye, so the first experiment in time lapse photography was conducted from 1872 to 1878. Instead of a single camera that we would use today, a series of cameras were set up along the racetrack connected to trip wires. The horse would hit the trip wires as it ran past, causing the camera to snap the picture. All of the pictures from the various cameras were then combined to create a type of time lapse video of a horse galloping. This video solved the bet of whether or not all of a horse's feet leave the ground simultaneously (they do!), and it also set the foundation for time lapse photography as well as motion picture photography.

Check out the full article along with the 1878 racing video here:

http://www.wingscapes.com/articles/timelapsearticles/from-ponies-to-the-projectcam-the-history-of-time-lapse-photography


Along with some background information, I found this article which further describes some basics about how to create time lapse videos. It contains tips about how to plan for the number of frames you will need (in other words, how much time you will need) to shoot in order to create a video of a certain length. It also describes how to edit the video and add music or other effects.

Read this article here:

http://content.photojojo.com/tutorials/ultimate-guide-to-time-lapse-photography/

Monday, March 10, 2014

Time Lapse Photography

time lapse photography


This week, I am going to post about time lapse photography. This is done by taking many, often several hundred, pictures of a scene and putting them together in post-processing. The result is an amazing short video that compresses several hours into only a few minutes. I especially liked the time lapse videos of the Northern Lights, since I would love to actually go see them in person some day. Here is the link to a great video on the Northern Lights:

http://vimeo.com/21294655

I also found an interesting article explaining to beginners the basics of time lapse photography. It had some helpful tips about how to control flicker, a sharp change of exposure from one frame to another, by shooting in manual mode. It also explained how to control the shutter speed and aperture in order to minimize flicker. The article then gave tips about how to save time in post processing by changing a few camera settings before you shoot, including manually setting the white balance so you don't have to go back through every picture in post processing to make them uniform. Here is a link to the article:

 http://www.lightstalking.com/timelapse

Finally, this next website gave ideas for time lapse photography that go beyond the "traditional" of shooting moving stars or clouds. Creative ideas include shooting moving cars in cities, ice melting, or bike stunts. Check out these pictures! The image of the tree in this blog is one of my favorites from this site:

 http://picpulp.com/time-lapse-photography/


Thursday, March 6, 2014

Experiments with Av Mode

With the recent snowstorm we had in Billings, I decided to go around campus and practice shooting in Aperture Priority (Av) mode using the exposure compensation feature. This is one of the first times that I have shot in Av mode, as I have been shooting in manual mode for years! It was interesting (and occasionally frustrating!) to see how the camera adjusted its shutter speed based on the exposure compensation, aperture, and ISO that I set.

Here are a few of my photos (and my attempts at editing them):

Specs: Av mode, +1 1/3, f/18, 1/15, ISO 400

Specs: Av mode, +2/3, f/4, 0.3, ISO 1600

Specs: Av mode, +1 1/3, f/16, 1/125, ISO 400

Specs: Av mode, +1 1/3, f/18, 1/80, ISO 400

Thursday, February 27, 2014

Detour into Photojournalism

For my blog today, I decided to explore the concept of photojournalism. While learning about landscape and night photography, the recurring theme is that of planning: deciding what exactly you want in the shot, when is the best time to get it, and what equipment you need to obtain the exact amount of focus you desire.

In contrast, photojournalism focuses on capturing the moments you can't plan. These articles I found suggest tips for getting good photojournalism shots, even if the only camera you have in the moment is your iPhone. Equipment is not quite as important here as long as you can anticipate and capture the moment. Photographs for news emphasize emotion, and there are several ways to show that emotion in the way the picture is designed. Composition, different angles, symmetry, and varying points of view on a subject are all important elements used to effectively demonstrate the desired emotion.

http://www.cnn.com/2011/IREPORT/09/02/capture.photo.bootcamp.irpt/

http://www.thetimes.co.uk/tto/public/youngphotographer/article2642999.ece

The Seven Rules of Dominance

This week, I spent time taking pictures that would display some of the seven rules of dominance. These "rules" suggest that certain elements of a picture will catch the eye more than others, and are useful tools to remember when designing a photograph. The rules of dominance include:
  • red is more attractive than yellow
  • large draws more attention than small
  • difference stands out more than conformity
  • jagged lines are more striking than curved lines
  • diagonal lines draw more attention than vertical lines
  • sharpness gathers more attention than blur
  • light is more attractive than dark
I have posted four photographs I have taken that incorporate these rules of dominance. See if you can find examples of the rules in each!


Wednesday, February 12, 2014

Night Photography: Round 2

This week, while exploring more aspects of night photography, I actually found a good website of what not to do. This article from Digital Camera World explains common errors of night photography and gives great examples of pictures that did not turn out so great. Sometimes, it is best to see examples of what not to do in order to avoid making similar mistakes.

http://www.digitalcameraworld.com/2012/03/23/12-common-errors-of-night-photography-and-how-to-fix-them/

In contrast, night photographer David Kingham has some fantastic examples in his gallery of great night photographs. I was amazed by the way he captured an entire semi-circle of the Milky Way or a full-circled star trail in his pictures. They are quite beautiful. Although they could not be posted here, my favorites are "North Moulton Barn Milky Way," "Path to Longs Pano," and "Snowy Range Star Trails."

 http://www.davidkinghamphotography.com/night

Additionally, David Kingham has posted a video about editing night photographs. He created some helpful tools specifically for night photographs that can be used in Lightroom and downloaded for free from his website. These tools include enhancing the Milky Way, sharpening stars, blurring stars, and removing light pollution.

http://www.davidkinghamphotography.com/night-photography-lightroom-presets

Wednesday, February 5, 2014

Night Photography


 While searching the web for ideas on night photography, I came across this blog from PhotoShelter.com listing six tips for shooting at night. A few of these stood out to me: first, including an interesting foreground such as a tree or rock can increase the interest of the photo and bring the viewer into the scene. It enhances the effect of the stars or star trail and makes a more dramatic photo. Second, taking a "dark frame" shot, or a shot with the lens cap on, can be layered onto the star or night photo in post-production in order to decrease noise and enhance clarity in the final shot. Here is the link to this article:

http://blog.photoshelter.com/2012/05/six-standout-night-photography-tips-to-help-you-master-the-craft/


9 creative photo ideas to try in December 2013Another concept I found while browsing the web is that of zoom burst photos. I had not seen these before, and the resulting image from zoom bursting can be quite interesting, making the subject or light appear to be moving toward the viewer. The zoom burst is achieved by zooming the lens in or out during a long exposure, making it ideally suited to nighttime photography. Here are some examples of zoom bursting that I discovered:


http://www.digitalcameraworld.com/2013/12/01/9-creative-photo-ideas-to-try-in-december-2013/


http://www.photographymad.com/pages/view/how-to-take-stunning-zoom-burst-photos

Thursday, January 30, 2014

Filters and Landscape Photography


This week, I decided to look at camera filters and their effects on landscape photography.


There are many types of filters that can be used to manipulate how the camera interprets exposures and colors. One of these is the GND, or graduated neutral density, filters. These filters are especially useful for the landscape photographer since often times in a scene the sky will be much brighter than the ground. The GND filter allows the photographer to darken the sky by a few stops while keeping an optimum exposure for the ground, allowing both the sky and ground to be viewed in a proper exposure without creating dark shadows or blowing out the sky. This effect can also be done in post-production if the photographer combines several photos of the same scene taken at different exposure values. However, if something moves in the scene between shots (like a blade of grass blowing in the wind) then that object will become blurred in the blended shot (called ghosting). Here is an excellent article describing the use of the GND filter versus exposure blending from landscape photographer Christopher O'Donnell:

http://christopherodonnellphotography.com/gnd-filters-vs-exposure-blending/

In addition to GND filters, polarizing filters can be useful in landscape photography. A polarizer can bring out warm or cool tones in a scene, emphasizing the changing colors of leaves or a bright sunset. Polarizers are also helpful on overcast days to add some "pop" to a scene with flat or gray lighting. Photographers can also use multiple filters at the same time; for example, one can create a unique effect with the proper exposure from a GND filter while simultaneously emphasizing warm tones from a warm tone polarizer. Here is a great article describing the use of filters in nature photography from the Nature Photographer's Online Magazine (the before and after photos shown here are worth checking out!):

http://www.naturephotographers.net/dw0502-1.html

Wednesday, January 22, 2014

Montana Landscape Photos


 Crazies Canopy, Montana 2009


Landscape photographer Jay Wesler provides some great examples for landscape photography in his work. I came across his photos by searching for landscape photographers in Montana. I took an interest in the photos of this local artist and thought his work was unique.

 http://www.jaywesler.com/


I really liked his black and white photography; it seems to be an unusual way to display landscapes. It is amazing to me how stunning a landscape can still be when it is void of its color. The black and white tones bring out the clouds and water more as well as creating a very dramatic contrast between the elements of the sky and the land. As you can see from his photos, what better place is there to take dramatic landscape photographs than in Montana?!

Here are few of my favorites (all photos by Jay Wesler):

Bear Creek, Montana 2004
Cloud Sweep, Montana 2008Crazies and Moon, Montana 2008

Week Two: Landscape Photography

While researching information for our first topic of the semester, landscape photography, I came across this article from National Geographic. It describes some basic landscape photography tips from Robert Caputo.

http://photography.nationalgeographic.com/photography/photo-tips/landscape-photography-tips/#page=1

At first, it seemed like a very simple article that was decent to read but not really helpful. However, it did bring up an interesting idea that I hadn't considered: even landscape photography has to have a point of interest. A common misconception of landscape photography is that it will be a good photo if you simply capture as much as possible of the landscape in front of you. Even when it looks great to your eyes though, the photo will not display the emotion you feel or interest you see unless you can find a way to highlight that.

This article provides ideas on how to choose an interesting subject in many different types of landscape settings in order to capture that emotion and portray it to your viewers. Taking a great photo of a landscape requires more than just point at the horizon and shoot; it requires you to decide exactly what it is you want to convey in the photo, whether it is an object such as an unusual tree or a feeling such as heat in a desert. Planning doesn't have to be difficult, but knowing what you want in the end result will enable you to find something in your landscape that more successfully portrays what you want, resulting in a better landscape photograph.

Wednesday, January 15, 2014

ART 347 Week One!


            For my first blog post of the semester, I decided to conduct a basic comparison of my two cameras by consulting dpreview.com and dxomark.com.
            The camera I have been using for the past five years is a Canon PowerShot SX110 IS, which first hit the market in 2008. It has been a great little camera, and I really enjoyed being able to use the manual setting with the LCD screen to learn how adjusting camera settings, such as shutter speed and aperture, can affect the outcome of the picture.
            The camera I recently received is a Canon EOS Rebel T3i/600D, which was introduced in 2011. This is my first DSLR camera, and I am very excited to “upgrade” my knowledge and abilities! This camera has a greater range of control than my previous one, enabling me to learn how to influence the outcome of my photos even more. According to DXO Mark, it is classified as an entry-level DSLR which will be great for me to be able to experiment with.


Here is a comparison of a few basic specs:

PowerShot SX110 IS
Rebel T3i EOS 600D
Lens
35mm fixed
18-55 mm and 55-250 mm interchangeable
ISO Range
80-1600
100-12800
Shutter Speed Range
15.0—1/2500
30.0—1/4000
Sensor Size
5.6 x 7.4 (2012 model)
14.9 x 22.3
Weight (gr)
245
515

           
             My new Rebel camera has a greater range of ISO and shutter speed abilities than the PowerShot has. It also has a larger sensor that will enable it to produce better quality images. The ability to change lenses will additionally allow for greater expression with zooming and depth of field. Although it is heavier and not as compact to carry around, my new camera should give me more control and freedom over the images I create while also producing better quality photographs.
              I can’t wait to get started!

 
Canon EOS 600D